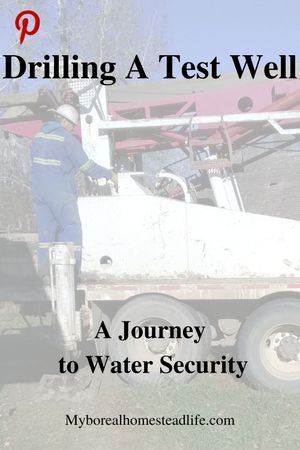
After much thought, I decided that drilling a large diameter water well was going to be my best option for water security on the homestead. But like most things, there are risks involved and of course, a large sum of money. Although doubtful that I would not hit water given the amount of water that I have around my property, how deep I needed to go was in question and there is still a risk of not hitting any water. And, should water be hit, what would the water well quality be like. So to avoid the cost of just drilling a large diameter water well to find all this out, a test well was drilled using dry auger test drilling.
Backstory
I have been struggling with what to do about water for the homestead pretty much since I moved here 30 years ago. I explored the use of a dugout that I dug in the blog Rainwater collection - essential water for use on the homestead and how, although it did not work out to ensure water security, the benefits to the ecosystems, gardens and animals proved to be a wonderful benefit. In the blog Water - The journey from sandpoint, dugouts and water tanks to a well I explored the variety of methods of delivering water to the house including the use of a sandpoint to hauling water and filling a 45 gallon holding tank in my cellar via five gallon pails. But as I explained in the blog, the sandpoint started giving me big problems and then after switching to the 45 gallon holding tank, that started getting old. It was time for something better.
After much thought, cost comparisons, option research (I explore options in the section The Well) and use of the Saskatchewan Water Security Agency Water Wells GIS site to see what other wells in my area were, I decided that I was going to explore drilling a water well. I talked to Wellen Boring Ltd, a company from Saskatoon, Saskatchewan. Their professional manner, willingness to answer my questions and work things into other trips to save me mobilization costs was much appreciated. After much discussion, I decided that to see what we were working with I would get a test well drilled using a technique called dry auger test drilling.
Why dry auger test drilling
Finding the perfect location to drill a water well to ensure quantity and quality of the water from the water well can be tricky. There are many ways to do this, one of them being water witching AKA water dowsing. I have researched many ways to do this that use bent coat hangers or pieces of willow to detect the best location to drill the water well. Some articles would say that you need to bury the coat hangers or metal wires in the ground for a number of days but all the articles make it very clear that not every one can do it and there are some that are very skeptical about its use claiming that no matter where you drill, you will find water.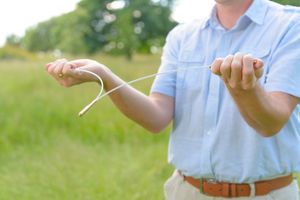
However, as Farmers Almanac suggested in Water Witching: Fact Or Fake? there are instances such as in "Sri Lanka alone, drill teams drilled 691 wells under the supervision of dowsers and found water 96% of the time." but in their own study "the dowsers were also asked to tell their drill teams at what depth they’d find the water and how much water they would find. The study’s findings showed that the dowsers’ predictions concerning depth and volume were accurate to within 10% to 20%." So it works sometimes, but why not all the time I wondered.
In the Water Science School of USGS water dowsing or water witching is described as "the practice of using a forked stick, rod, pendulum, or similar device to locate underground water, minerals, or other hidden or lost substances, and has been a subject of discussion and controversy for hundreds, if not thousands, of years.". They describe the success as being attributed to "Some water exists under the Earth's surface almost everywhere. This explains why many dowsers appear to be successful.". Okay fair enough, but I wondered if there could be actually something to this ancient technique.
In the article Why dowsing makes perfect sense by the NewScientist, the author actually went out and tried water dowsing with a seasoned water dowser. Being successful he writes that "I have to confess, however much I might be able to rationalise what was happening, my newfound ability freaked me out a little." but he goes on to say that "Scientifically minded sceptics often express deep dismay at the credulousness of people who believe in dowsing, extrasensory perception and other “inexplicable” phenomena. They should not be so harsh. The illusions that make them seem plausible are astonishingly subtle and powerful.". So true of so many things.
Although I was fully prepared to explore the world of water witching AKA water dowsing AKA well witching, I could not find anyone local to talk to and was not prepared to invest a pile of money on my own ability, or lack thereof, to water witch. It would be solely for interest sake. So, I relied on my own knowledge of my property, my personal knowledge of water movement and the experience of the water well driller from the well drilling company I used, Wellen Boring Ltd.. When I asked him about why he did not use water witching AKA water dowsing, he essentially relayed the same sentiment as the research I had done and felt that although there could be something to it, the knowledge of water movement was going to ensure success whereas the water witching may not Fair enough. So to determine water well depth and if there was in fact water, dry auger test drilling was employed.
What is dry auger test drilling
Deciding where to locate the water well was part of the process as this will decide where to drill the test well. Discussing this with the driller, we decided that given the terrain, the amount of water around my property in relation to my home and the hydrologic cycle that occurs, that we could drill the water well pretty much anywhere and get water.  But decided that to keep the end use of the well water in mind and ease of bringing it into the house, a location close to the house was the best place to start. We decided on a location about 12 feet from the north east corner of my house. Time to drill the test well.
The dry auger test drilling that is performed by Wellen Boring Ltd uses a six inch auger head mounted onto the back of a truck that allows for the auger to be raised and lowered while drilling into the ground adding extra sections of pipe as the auger is lowered into the ground. Effectively, it is an over sized post hole auger. At varies stages of the drilling process it allows you to assess the soil make up and water holding capabilities as it is lowered into the ground, drilled deeper and then bringing the charged auger to the surface.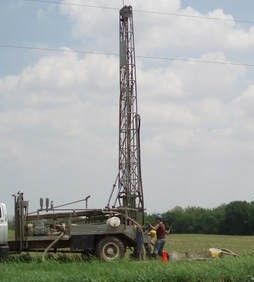
As he lowered the auger into the ground the soil make up was noted as follows:
- 0 - 9' - Sand Brown, medium clean
- 9 - 16' - Sand fine grey with clay layers
- 16 - 48' - sand grey clean
- 48 - 50' - Clay grey
Once he hit the 16 - 48' level is where the soil turned into a soupy mess as we had hit the aquifer and determined the water table. An aquifer "is an underground layer of water-bearing permeable rock, rock fractures or unconsolidated materials (gravel, sand, or silt). Groundwater from aquifers can be extracted using a water well.". When the driller hit this layer, the sand was completely saturated and the water percolation and permeability was exceptional so the driller thought. It is also where we started to see small bits of red iron soil coming to the surface. Being that my sand point, about 14' away inside the cellar of the house, would have been drawing water from this same layer and that it would have been about the same water level as in my dugout to the south, this was no surprise to me. But still interesting none the less.
As the driller was drilling through this layer he explained that by performing a test, the rate of fill and a water quality could be determined. To do this he would conduct a water permeability test using a 5 gallon pail that was filled with the saturated sand. To the center of this pail of sand, he then inserted a perforated 1 1/2 piece of pipe that he had placed inside a cloth sock. Essentially, he was simulating what would happen once a well was drilled. He was impressed with how quickly the water filled the center of the pipe and figured that I would have a great fill rate should I decide to go with the water well. He also extracted the water to take back to the workshop to test for water quality to ensure that the water met standards for use as determined by Water Security Agency. He explained that he would be testing for coliform bacteria, nitrates, and contamination from other sources.
Now one would think that when he hit water, why keep going. The well driller explained to me that although you can effectively suspend a well in sand, it is by far better to be able to rest the bottom of the well into clay if we could find it. Not only would it give extra water storage, putting the bottom of the water well casing into the clay prevents movement and makes setting the the water well that much easier. So we kept drilling until we hit the clay indicating the bottom of the aquifer at 48'. The extra two feet was drilled to ensure that it was not just a narrow band of clay. The driller explained that having the well resting in two feet of clay was exceptional.
The Decision
I was very impressed with the time the driller took to explain the process and answer my questions that would help me to make a decision. After the test well was finished and the well driller returned to the workshop, I contemplated what he found out while I awaited the results of the water sample he took. Looking at the costs associated with drilling the well, a few extra feet to ensure that the bottom of the water well was placed in the clay seemed worth the added costs associated with it. It would ensure a larger volume of water storage, make the success of the water well more attainable and make the well drillers job a little easier by not having to suspend the well in the water saturated sand of the aquifer. But spending 10 - 15 thousand dollars was a hard pill to swallow no matter how much sugar I used.
A few days later I received a call from Wellen Boring Ltd that although the water was hard and contained iron, the water contained nothing that would make it unusable by Saskatchewan Water Security Agency standards.
Being that I had dealt with the hardness of the water and the iron it contained for over 20 years, I thought no problem, a water softener would deal with that problem. So I told him that I had decided to go ahead with the drilling of a large diameter water well and the date was set for October 21, 2021.
Little did I know what challenges I would encounter with this decision.
I hope you enjoyed this next installment in Water - The journey from sandpoint, dugouts and water tanks to a well as I work towards water security. If you did and If you enjoy this content, please consider joining the My Boreal Homestead Life community. By supplying your email address at the bottom of the page and hitting "sign up" or by clicking Join, you will ensure you get an email notification when I post new blogs to the My Boreal Homestead Life site.
Thank you for joining me on the front porch of My Boreal Homestead Life as we explore this Homegrown, Homestead life, In a modern world.
Additional resources:
Well Owner’s Handbook A Consumer’s Guide to Water Wells in Minnesota
Stoney Ridge Farmer - Live drilling a well
A Landowner's guide to Water Well Management