
For many years I tried to grow members of the Brassica family only to be met with limited to no success. I would plant my nice looking bedding plants only to be met with wilted plants weeks later. When I pulled the plant up I would find no roots at all, but would see maggot looking critters attached to the stub. But I was confused because I could grow onions successfully. Eventually, I gave up and quit planting cabbage, cauliflower and broccoli in any amount except for experimentation purposes. But then in 2021 I figured out a way to get an impressive crop of Brassica with a cabbage root maggot organic control and as an added benefit it worked for cabbage moth control as well.
What are cabbage root maggots
I could never understand why my onions would have little to no damage but yet my cabbage, cauliflower and broccoli would be decimated. Then I did some research and found out that cabbage root maggot and onion maggot are two different species and are crop specific.
As identified in this article from the University of Minnesota Extension office, cabbage root maggots (Delia radicum) start their lives as flies that emerge from the ground in the spring where it over wintered as a larvae. The flies are dark gray with dark stripes and they lay their eggs at the base of the host plant where the eggs hatch and feed on the roots of the host plant. Once the eggs hatch the maggots which are a yellowish white begin feeding on the roots of the host plant ultimately ending in the death of the host plant.
The flies are attracted to decaying plant matter and are most active during the cooler temperatures of the spring as temperatures greater than 35C (95F) in the top two inches of soil will kill them. All favorable conditions to the spring planting of Brassicas. But also why they are not as impacted later in the summer.
I do quite a bit of trench composting and during the winter and summer I dump my garden scraps directly onto the garden to be worked in though hoeing and or tilling in the spring, so it makes sense that the cabbage root maggot fly would be attracted to my garden.
What are the host plants for the Cabbage Root Maggot
All members of the Brassica family can be affected by the cabbage root maggot. The Brassica family includes broccoli, brussels sprouts, cabbage, cauliflower, collard greens, kale, rutabaga and turnips.
Interestingly, I was still able to grow turnips and rutabaga's. In doing the research, I feel it is because I direct sow these two plants and so by the time they have grown enough to become an attractant for the fly, the soil temperature had warmed sufficiently to kill the eggs and therefore break the cycle. I still had some damage, but not enough that I could not use the turnip or rutabaga.
Control of Cabbage Root Maggots
For years, I did not grow brassica's in any amount. I always bought a few plants each year and experimented with different methods of cabbage root maggot organic control. Chemical control was something that was always there, but I did not want to do that. And besides, research showed its success was limited as well. So, I experimented with different things such as:
- Planting in cans put around the plant and pushed into the ground - the thought was that if I make a barrier, the maggots can not get at the roots. And in theory it should work, but once the roots grew outside the can, they were attacked by the cabbage root maggot. Not to mention that the cabbage was always thirsty and so more watering was needed.
- Companion planting - there is some suggestion that companion planting brassica's with onions and carrots will confuse the cabbage root maggot fly. So one year, I planted a few cabbage later in the year when the carrots were about six inches tall. It seemed to work and so I tried it the following year only to be met with cabbage plants being attacked by cabbage root maggot. I thought it was because the carrots were not up yet when I planted the carrots and it might have been, but I think the success of the previous year had more to do with ground temperature than anything. I also tried planting with marigolds with no success other than some pretty flowers, which I suppose is a success in some ways.
- Egg shells - I sprinkled the egg shells at the base of the plants and mixed in the planting hole. The thinking here was that the egg shells would stop the fly from laying the egg at the base of the cabbage plant and should one get through, the egg shells in the soil would kill the maggots. Oh how naive I was!
- Diatomaceous earth (DE) - thinking the fine powder of this product made from the fossilized remains of tiny, aquatic organisms called diatoms, I thought it would be a great deterrent. However, any moisture at all and it would turn into a paste which effectively made it fertilizer.
- Planting in containers - my thinking was that if I take the cabbage out of the garden it would have less chance of being affected. And although it worked in a limited capacity, I forgot about the heavy water needs of cabbage.
So with all these trials over the years I was about to admit defeat and never grow cabbage, cauliflower and broccoli again. But then in the winter of 2020 I did some more research and discovered that floating row covers were identified as a cabbage root maggot organic control and cabbage moth control method. I got excited about the prospect of growing brassica's again, started a bunch of seeds and ordered my floating row cover from William Dam Seeds in Ontario. Go big or go home!
According to Wisconsin University - Wisconsin Horticulture Extension, Floating row covers are "a spun-bonded or woven plastic, polyester or polypropylene material that is placed over plants to exclude pests, act as a windbreak or extend the growing season by retaining heat — all while still being permeable to light, water and air.".
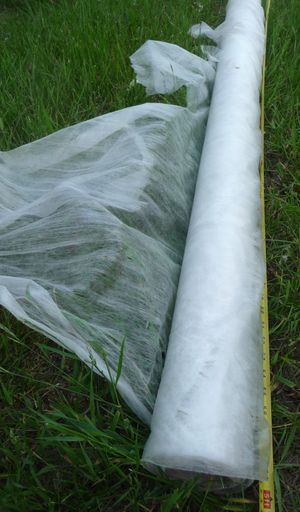
After much consideration of factors such as weight of the floating row cover and strength I ended up deciding on the Agryl P-12, 5' wide and 328' long. When it got here, I thought I should have maybe gone for the 30' (10 m) wide row covers, but then I decided to make a Floating Row Cover Tunnel.
How to make a DIY Floating Row Cover Tunnel
Assemble the necessary items
To make this DIY Floating Row Cover Tunnel you will need some supplies. I rooted around my place and came up with the following.
-
Agryl P-12 floating row cover I had bought in the spring.
- Materials for hoops to hold the floating row cover off the plants. I figured out that I wanted to have about 30" - 36" (76 - 91 cm) of length to make the hoop tall and wide enough to allow the plants room to grow. So, I used some heavier wire I had and cut to 48" (122 cm) to allow for anchoring in the ground. I did not have enough wire so one inch ABS pipe cut to 36" (91 cm) was used.
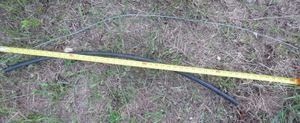
- Because the ABS pipe was too soft to push into the ground, I needed some metal anchors that I could slide the pipe over. I was able to cut some of the excess wire pieces to make anchors and I found some old spikes that would work perfectly. I would also need some anchors to hold the ends of the tunnel in place and so, wire was bent into the shape of about a 6" (15 cm) staple.

- Weight. Anything will work in this case as long as it was heavy enough to hold the sides of the floating row cover tunnel down and prevent it from getting air borne. I came up with some old pipe, pieces of a long gone panel, a piece of a metal water trough, bricks and firewood. Sand bags would work great, but I thought I would need to make a lot of them and did not want to be bothered. The thought of piling dirt on the floating row cover down the length of the entire row only to have to remove it each time I wanted to weed did not appeal to me either.


With the assembly of everything I thought I would need, I could now start assembling my DIY Floating Row Cover Tunnel for cabbage root maggot organic control.
Building the DIY Floating Row Cover Tunnel
The first thing that needs to be done is put in the hoops. Because I wanted to maximize the height and width while still allowing for some of the floating row cover to lay on the ground, I decided to space the two sides of the wire 20" to 24" (51 - 61 cm) apart. Simply push the wire into the ground about 6" (15 cm).
For the one inch ABS pipe, I pushed the spikes head first into the ground to leave about 4" (10 cm) above ground. I did the same for the wire pieces.
Feed the one inch ABS pipe over the spike and wire to make a hoop. I left them off the ground for this picture, but I pushed the ABS pipe to the ground after.
Continue this process spacing the hoops about 6' - 8' apart depending on how long the row is. My rows are about 60' (18 m) long, so I need a few.
After all the hoops are in place, it is time to stretch out the floating row cover. Set the floating row cover roll at one end of the row of brassica's so that you are pulling up from the bottom on the roll. Grab the loose end and start walking down the row.
Being this floating row cover is fairly light, doing this part of the project on a windy day can prove to be problematic and so I would advise doing it on a calmer day or evening. But if it does move a bit, no worries as it can be straightened out later.
Pull the floating row cover past the opposite end of the row by about two feet ensuring that the floating row cover is equally spaced on each side of the hoop. Gather the floating row cover together and tie it into two knots, preferably one over the other. These knots will make it more difficult for the floating row cover to pull out from the two 6" (15 cm) staples you will push in, one in front of the knot and one over the knot. Pound them in well.
After you have secured the knots in place, walk back to the start of the row, ensuring that the floating row cover is laying over the hoops. Don't worry about it being perfect as it will straighten out when you snug up the floating row cover. Unroll the floating row cover a bit more so that you have about the same 2' (0.6 m) as you did previously. Cut the floating row cover as best you can.
Grab each side of the floating row cover and pull the floating row cover into place ensuring that all the hoops are covered and that the floating row cover is equally laying on each side. Tie two knots into the cut end of the floating row cover and grabbing the knot, pull the floating row cover so that it is snug over the entire length of the row. Secure to the ground as you did on the other end using two 6" (15 cm) staples pounded into the ground. I then mound some dirt over the floating row cover from the closest hoop to the staple to help stop bugs from getting in and to stop the wind from getting under the floating row cover.
Securing the DIY Floating Row Cover Tunnel
Now that the floating row cover is stretched out and snugged down, it is time to weigh it down all the way down the row, on both sides. There should be about four inches (ten centimeters) of floating row cover laying on the ground on each side of the hoops. Using the weights you have gathered, start placing them at at each hoop on both sides. If you are using firewood, be sure the wood is holding the floating row cover in place.
If you are using bricks, ensure they can't be moved by rolling them up inside the excess floating row cover.
If you are using pieces of pipe or metal, ensure that you roll the pipe into the floating row cover excess and push it lightly into the ground. Otherwise, the movement of the floating row cover in the wind will cause the pipe to roll off.
Once you have secured the floating row cover down on each side of the DIY Floating Row Cover Tunnel, just take a look to ensure that the floating row cover is laying flat on the ground and that it is not suspended in the air due to the garden topography. If it is, put more weights on or just mound some dirt onto the floating row cover where necessary.
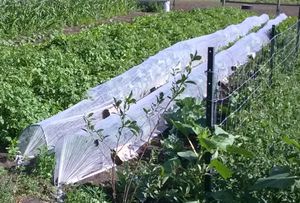
With that, you have completed your DIY floating row cover that will enable to protect your brassica's from the cabbage root maggot, cabbage moth and any other insect that might be hungry.
Keep an eye on your DIY Floating Row Cover Tunnel during the first winds so that you can add additional weights if necessary to prevent flapping or ballooning of the floating row cover itself. I was very impressed by how well it held up in the wind. The shape and build of the DIY Floating Row Cover Tunnel and the fabric itself seem to stand up to some severe winds very well. Although the 2022 DIY Floating Row Cover Tunnel may have some sagging due to the floating row cover being soaked, it held up well to the last couple days of rain and wind.
Advantages of the DIY Row Cover Tunnel
- Very affordable to build. Because it is built with things I had already laying around, the only thing I had to buy was the floating row cover which in 2021 cost me $73.95 CDN with shipping. But that was 328' so I have enough to last me 3 years, making the cost around $25.00 CDN per year. If I would have had to buy materials for hoops and weights the cost would obviously be more.
- Easily weeded - weeding is easily accomplished by lifting off two weights and then lifting the floating row cover up onto the top of the hoop. Once completed that section, remove the next two weights and move down the line, replacing weights as you go.
- Sizeable - This DIY Row Cover Tunnel can be made to fit any length of row. Notice how I used dirt on the one side, but used weights on the opposite for ease of opening to weed.

- Helps retain moisture - I noticed in 2021 when I used the DIY Floating Row Cover Tunnel for the first time that the weeds were about 4" (10 cm) taller inside the tunnel than the surrounding area, indicating increased soil moisture.
- Very little thermal affect so it can be used throughout the summer - Because of the filtration of the fabric of the floating row cover, it will help with sun scald on sensitive plants and in the case of brassica's allow for them to be a bit cooler, or so I felt.
- Easily watered - the fabric allows for water to easily access the plants. It will pool a bit on top of the fabric sometimes when it is first new but after the first time it gets thoroughly wet, the problem goes away.
- Organic protection against cabbage root maggot fly, cabbage moth, flea beetles, white flies and whatever other above ground bug you have.
- Easy to see inside to determine when harvesting need be done.
- Reusable if in good shape.
- All your garden produce comes in bug free - no little green worms in the broccoli flowerettes.

Disadvantages of the DIY Floating Row Cover Tunnel
- Timing - the DIY Floating row cover must be in place either as soon as you plant your brassica's or before the fly's start to fly as recommended by the University of Minnesota Extension
- This particular weight of floating row cover, although surprisingly strong, can get a tear in it especially if it is rubbing against one of the weights used. I had a tear develop last year, but it was easily fixable with duct tape on both the outside and inside, pressing them together and sandwiching the torn floating row cover between.
- Due to the width of the floating row cover, I feel the width and height of the DIY Floating Row Cover Tunnel is pretty much maxed. And so it is small once the brassicas get to full size and will appear crunched inside. I have thoughts of building wooden boxes wrapped in floating row cover but have not done it yet. I could have also broken off the bottom leaves to make more room but I left mine alone and they were fine until the plants (Broccoli) got so large I just took the floating row cover off. By that time it was late enough in the season (end of August) and there was no worry of cabbage moth or cabbage root maggot.

Results of the DIY Floating Row Cover Tunnel
As I used the DIY Floating Row Cover Tunnel for the first time in 2021, I did not know what to expect. Because of this, I had some kinks to work out, the plants outgrowing the DIY Floating Row Cover Tunnel being one. Ensuring there was enough weight in the right spot was another. The instructions I give in this blog on how to build this DIY Floating Row Cover Tunnel is what worked for me and I am sure it may be tweaked some as time goes on. But at the end of the day I was so happy with the end result. For the first time in over 30 years of gardening here, I had a wonderful crop of bug free, clean brassica's.
I hope you found some value in this information and give the DIY Floating Row Cover Tunnel a try. If you enjoy this content, please consider joining the My Boreal Homestead Life community. By supplying your email address at the bottom of the page and hitting "sign up" or by clicking Join, you will ensure you get an email notification when I post new blogs to the My Boreal Homestead Life site.
Thank you for joining me on the front porch of My Boreal Homestead Life as we explore this homegrown, homestead life in a modern world.
Additional resources
- For additional reading on the Cabbage Root Maggot (Delia radicum), check out this article from the University of Massachusetts Amherst - Extension Vegetable Program
- For additional reading on Cabbage moth (Pieris rapae) check out this article from University of Minnesota Extension
- William Dam Seeds for row covers
- Lee Valley for row covers
- West Coast Seeds for row covers
- Johnny's Selected Seeds for row covers
