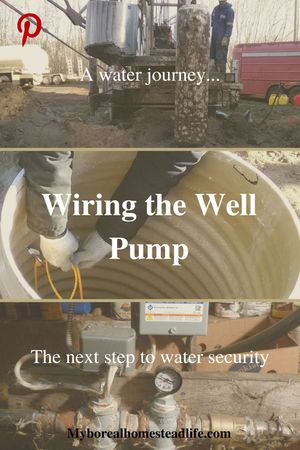
Having made the decision to have a well drilling contractor drilling the well and to have a well pump contractor do the work of installing a new well pump, taking the well plumbing the final steps of being able to have water inside the house taps fell on me to complete. It involved setting up the pressure tank and well pressure switch wiring.
Installing a new well pump
I believe that water security means having a number of water supply sources for household, homestead and animal use. For me, this journey started with Water - The journey from sandpoint, dugouts and water tanks to a well. Realizing that although sandpoint's and hauling water were fine in the short term, for the long term a water well was probably going to serve me best. But to achieve this, a step by step process would need to be undertaken. The first of which was drilling A Test well - The next step to Water security and then making the decision to proceed with drilling a well. Although the experience of having a well drilling contractor bore a large diameter well was interesting, it was not cheap. But at the end of it I had a well with good flow rates as I explored in Well, it's a well. The next step to water security.
But having the water sitting in the well casing does me no good unless I am going to install a hand pump or use a bucket and rope. So, as I explored in For use on the Homestead the new well requires Well Plumbing! The next step to Water Security, the well pump contractor had everything set up to efficiently bring the water from the water well to the house, I just needed to get it tied into the house.
I could have hired another contractor to do the work of hooking the system up and wiring in the well pressure switch but I decided that it was something I could do myself. I have done quite a bit of plumbing over the years and figured I could handle it. However, the electrical work was a little outside my comfort zone but after talking to my Dad and an electrician friend of mine, I decided to tackle it myself.
Set up well pump and pressure tank
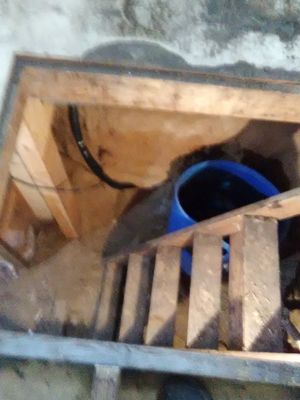
With the 1 1/4 inch Medium Density Polyethylene Series 75 Polytube and power cable in the cellar I need to attach the polytube to the existing pressure tank and wire in the well pressure switch. But first, I need to go shopping for the supplies to attach the polytube to the house system and find the necessary electrical supplies.
Being that I had a preexisting pressure system in place prior to drilling a well, getting the necessary plumbing supplies to tie into this system was important. I needed to tie in the pressure tank, the pressure switch and tie it into the supply line for the house. I was not one hundred percent sure what I needed but with the help of my local plumbing supply store I was able to determine what I would require.
It was determined that I would need the following:
| Quantity | Description | Unit Price | Total Price |
|---|---|---|---|
| 10 | 11/4" Gear clamps | 1.48 | 14.80 |
| 2 | 11/4" Galvanized male adapter | 4.85 | 9.70 |
| 1 | 1" Galvanized male adapter | 3.57 | 3.57 |
| 1 | 3/4" Teflon tape | 1.81 | 1.81 |
| 2 | 11/4" Galvanized cross | 18.77 | 37.54 |
| 2 | 11/4" x 3/4" Galvanized reducing bushing | 5.36 | 10.72 |
| 1 | 11/4 FIP Brass ball valve 600lb | 28.01 | 28.01 |
| 2 | 11/4" x 2" Galvanized pipe nipple | 4.80 | 9.60 |
| 1 | Pressure switch 30-50 | 35.34 | 35.34 |
| 1 | 3/4" Pressure relief valve | 16.70 | 16.70 |
| 1 | Pressure Gauge | 11.68 | 11.68 |
| Total Cost (Pretax) | $179.47 |
It was suggested that although not completely necessary, a pressure relief valve would be a good idea. I decided to go with it as an extra level of security should the pump not cut out when the pressure level is reached was actually a good idea. No sense blowing the house lines should something go wrong.
With these pieces in hand, I first dry fitted everything in the order I needed to work with the space I had and what I needed to plumb in. With this complete, I then took it apart, attached Teflon tape to each join and tightened them up. Once completed, I then used some plumbers strapping to attach this contraption to the wall support I had created under my stairs.
The next step was to attach all the plumbing to this contraption starting with the polytube coming from the well. My well plumbing contractor recommended always putting three gear clamps on each join and to tighten one of the three opposite to other two. He believed it made for a tighter join and because it made sense to me, I replicated this on each of the joins on this contraption. With three gear clamps slid over the polytube coming in from the well, I pushed the polytube onto the galvanized male adapter and secured it with the gear clamps. Moving down the line, I did the same with the line going to the pressure tank and finally ending with the line going to feed the house water supply. I was close to completion, but needed to get all the electrical done first.
Well Pressure Switch wiring
With the plumbing part of this project done, the wiring was necessary to make everything work. Luckily for me, I had wired in a switch for my jet pump that I had used when I was pumping from the sandpoint and in later years from the 45 gallon barrel as I explored in Water - The journey from sandpoint, dugouts and water tanks to a well.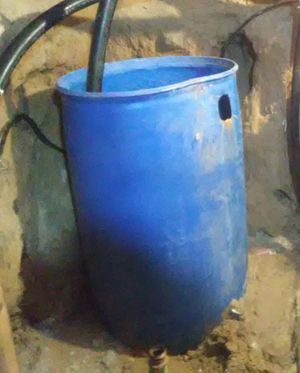
The reason I say lucky for me is because although the submersible well pump I am using requires a 240V service, by disconnecting the switch and making the two wires live from the breaker box, I was able to supply a 240V service to run the well pump. I did not have to pull a new wire from the breaker box to the cellar.
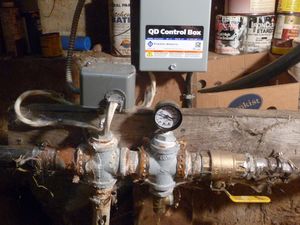
Using the switch box as a junction box, I joined armored wire to the existing wires coming from the breaker box and ran the power into the pressure switch. Then using a piece of jumper wire, I connected the pressure switch to the QDControl box for the well pump following the diagram inside the control box. And finally, I attached the wire from the well that the well pump contractor had installed from the well. The system was now complete.
I rechecked everything starting with the polytube coming from the well which is attached via a galvanized adapter to a galvanized cross which feeds the pressure switch above and then to the pressure tank from the bottom. This leads into another galvanized cross which feeds the pressure gauge on top and the pressure relief valve which then feeds into the shutoff valve and finally into the line going to the house. With all the plumbing secured, I checked the armored wire coming into the back of the pressure switch from the junction box which then connects via the jumper wire to the QDControl box and finally the wire coming out of the bottom of the QDControl box to the submersible well pump. Only one thing left to do.
And that final thing to do was to insert the additional breaker because the well pump required a joined two pole 30 amp breaker to run the 240 V submersible pump. But to do this, I needed to rearrange breakers in the breaker box. I get nervous working in the breaker box, so I shut the main power off at the pole. I was not able to find a double pole 30 amp breaker that would work in my breaker box so I decided to use two 15 amp breakers which I would join with a metal cap to make the two 15 amp breakers into a 30 amp tandem breaker. The metal cap is to ensure that if one side trips, they both trip.  I started to move breakers around so that I could fit in the additional 15A breaker beside the original one that ran the switch in the cellar that I had now converted into a junction box. All of this took a bit of doing and so by the end of it, I was doing the final connections via flashlight. But finally, I was able to turn the main power supply back on and move the 30 Amp breaker to the on position.
And it worked!!! I turned on the water and let it run while I phoned my Dad to tell him what I had accomplished and then also called my electrician friend to let him know that I had succeeded. The electrical portion of this project was the most intimidating to me and so managing to get it done through thoughtful processing, some advice and research was a huge accomplishment for me. I was super happy!
Although the $179.49 (Canadian Dollars) pretax I spent on this project pales in comparison to the $16,645.50 (Canadian dollars) pretax, I had spent thus far, I felt good that I was able to save myself quite a bit of money by doing this project myself. And in the end, having this type of water security in place for a total cost of $16,824.99 (Canadian dollars) pretax was decent considering the life span of this project and the time and money savings it should afford.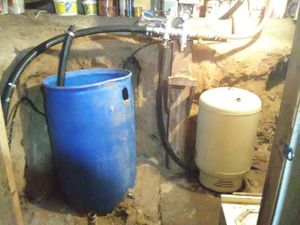
Water Analysis
When the well drilling contractor drilled the test hole as I explored in A Test well - The next step to Water security, he came back that although the water was hard and contained iron, the water contained nothing that would make it unusable by Saskatchewan Water Security Agency standards. So I used the water. I used a lot of water. I wanted to really flush the well and set the water veins that were feeding the well and so I used more that I would normally. For many years I had rationed water so that I would not have to haul it and so being able to use whatever I needed to use was a novel concept for me.
But while using it, I started noticing that hard water films were developing on the fixtures, rust was settling in the troughs and rust was staining the sinks and toilet. With the surface water I used from the sandpoint I was used to this type of water but I thought before I started putting in water treatment systems, that I should really have the water tested.
So after about a month of using the water, I phoned the Saskatchewan Research Council - Environmental Analysis Laboratories and requested they send me a kit to test the water. The kit was sent to me quickly and I conducted the sampling process and returned the kit to them for analysis. On February 1, 2022 I received the results of their analysis and it was not what I expected at all.
Final thoughts
This project has been a long time in the making. And although it has taken me quite some time to make the decision to spend $16,824.99 (Canadian dollars) pretax, I am hopeful that this well will be the final piece to water security on the homestead.
If you enjoy this content, please consider joining the My Boreal Homestead Life community. By supplying your email address at the bottom of the page and hitting "sign up" or by clicking Join, you will ensure you get an email notification when I post new blogs to the My Boreal Homestead Life site.
Thank you for joining me on the front porch of My Boreal Homestead Life as we explore this Homegrown, Homestead life, In a modern world.
Additional Resources
- Good Simple Living - Putting In Our Well Off Grid! Well Drilling
- Good Simple Living - Off Grid Water - How To Flush And Clean Out A New Well
- Homesteading Family - Our Farm Watering System at Riverbend
- Stoney Ridge Farmer - How to Install A Solar Off Grid Well pump System
- R.C. Worst Co - How to Install and Wire a Pressure Switch
- R.C. Worst Co - How to Wire a Franklin Electric QD Control Box (1/3-1 HP)
- Heartway Farms - Developing a Natural Spring | Off-Grid Water | Well | Prepping | WROL | Solar Pump